Saturday, July 3, 2010

Picture perfect birthday...

So a really good friend (and fellow scrapper) of mine recently broke down and went on a cruise.  She also likes to take pictures.  While I was looking through them I noticed she commented on one she really liked but said it would’ve been better if there was a drink in it.  You know the picture I am talking about…a shot of the ocean from your lounge chair where you just see feet, ocean and a cool refreshing drink!  Well, that gave me the idea for her birthday card.  I had been wanting to try this technique that I found on the Split coast Stampers website.  Well, I changed it up a little to fit my needs.  Here is my interpretation…

Cartridges used for this card:
Paper Dolls for Everyday - cloud
Forever Young - legs
From My Kitchen – cup *note: straw was cut off
George and Basic Shapes - sun
Life’s a Beach – flip flops
My Community - feet
Preserves - lemon
Stand and Salute – clouds
So I started with a 6 x 6 square card and a 5 ¾ x 5 ¾ layer in which I used chalk to create the sea and sky.  I used my Gypsy to create all of my cuts.  Once completed, I assembled the layers and  chalked the vellum (cup) with red, orange and yellow, then added trimmed the top with a piece of ¼” wide Sticky Tape from PK Glitz and covered with PK Glitz Crystal glitter.  I decorated the lemon slice using a glitter pen and chalk ink to give it a little pizzazz.  I cut a straw down to a proportional size.  I cut the legs down to the size I wanted and inked them, then inked the feet and glued them together.  I then used Fruit Punch stickles to create the toenails.  I then used my Crop-a-dile to punch three holes in the flip flops so I could feed the ribbon through and then I inserted the feet.  I chalked the sun to the color I wanted and I laid the cloud cut outs down and chalked around them and then popped two of them off the paper.  I used a scrap piece of tan cardstock for the sand and tore it, then ran it through the Zyron twice (once on each side).  I put the card layers together and then added my cup and popped up the feet/flops.  Once all pieces were in place I took some sand and covered the tan cardstock….and there you have it…the picture perfect birthday card!

I know this doesn’t really go, but it is something she wanted after I sent her an email about a panda rescue effort in China after their most recent earthquake.  I just aim to please.  He is cut from Create a Critter.  I flocked him and used glossy accents on his nose and eyes.  Isn’t he super cute?!    

Tuesday, June 29, 2010

I did it! I am a Circlet!

Boy, nothing like waiting until the last minute, huh?  Well, I really have been on the fence about this for a lot of different reasons.  I was convinced by some of my enabler buddies on the MB, decided to cut back on a few things and bite the bullet.  So, I don’t like the name “Circlet”; I think I will have to come up with something else.  I mean Cricette is better than that for goodness sake!!  I know there has been some discussion on the MB, so I will have to see what I like out there.  So, who else is a Circlet?!

Friday, June 25, 2010

A challenge for myself and to you...

So today I was browsing through my RSS feeds and a post from Jennifer McGuire, ink caught my eye.  It was entitled “NEW Cards for Kids Card Drive - Round 3!”  As I was reading I was so touched and I feel compelled to challenge myself for the very first time (craft wise) to accomplish a project.  I am challenging myself to create AT LEAST one card for every child on the list (13 cards).  I am challenging you to do what you can.  Please join me in providing these children and their families with an uplifting card.  They face difficulties the majority of us will never know or understand and if I were in their shoes I would love to know that people were sending prayers my way. 
If you would like to take on my challenge, please post a comment letting me know what you propose to do.  Include a link to or the address of your blog so I may follow you and check up on your status with this challenge.  The deadline for this round of cards is Aug 30.  For further details on this project such as info on the children and their families, where to send the cards, please click here and here

Wednesday, June 16, 2010

Patriotic Birthday Card

Well, like I have said before, I think it is important when making a card to make it special for the recipient by using a color, symbol or putting a meaningful memory or saying into it.  I mean what is the point of hand making cards for people if you don’t want it to mean anything to them?  You could just go buy one if you didn’t want it to be personalized!

One of my uncles is a very patriotic guy and really appreciates the US flag.   Being that I hadn’t used my Stand and Salute cart EVER I thought I would try to get some use out of it by making a birthday card for my Uncle.  It is not easy to make a card like this attractive, but I did the best I could.  I hope you like it, but better yet, I hope he likes it J.
I used Stand and Salute for the flag, A Child’s Year for the image of the kid holding a flag with his wagon in tow.  Happy Birthday sentiment was stamped using a glue pad and then PK Glitz glitter (which I absolutely love – it just sparkles so much better than regular glitter).  Thanks for looking!

Tuesday, June 15, 2010

Awesome envelope tutorial - UPDATED

I am ALWAYS looking for envelopes for certain cards, aren't you?  Well, search no more!  All you need is paper, some type of adhesive, a Scor-pal, bone folder, a drafting ruler and one minute and you can have any envelope you need!!  The Frugal Crafter has this awesome tutorial on her blog about making envelopes with your scor-pal to fit all different sizes of cards.  Here is the tutorial and a link to her blog to get the cheat sheet for the sizes.  How awesome is that?!!


I thought I would add this handy dandy card size chart for everyone.  I found this on google, but have no idea who to give credit to.  I think given the above video, this chart will prove to be very useful.

Saturday, June 12, 2010

Father's Day Card - UPDATED

**I AM SO EXCITED!  THIS CARD WAS HIGHLIGHTED IN THE CRICUT CHIRP NEWSLETTER ON JUNE 15, 2010 (VOL. 212)!!**

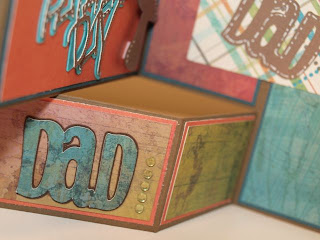
My father is an architect and so I wanted to try one of those unusual cards and opted to go with the Tri-shutter card.  Thanks to this website I got the needed instructions to make it.  I really like the way it turned out and am planning to utilize their instructions to attempt some of the other cards featured in the near future.

For this project I used:
Cricut Cartridges: Create a Critter (owl), Calligraphy Collection (Happy Fathers Day), Beyond Birthdays (Dad), and Wall Décor and More (mushroom)
Paper: Stampin’ Up! Soft Suede, MME Magnolia, and DCWV Rock Star.

I hope he likes the card.  I decided that I wanted it to be simply say Happy Father’s Day and chose not to put a sentiment in the card.  I mean, really, most men don’t care for sappy sentiments, right?  I know my dad doesn’t.  What he will know is what the mushroom means…Dad’s of girls are like mushrooms, they are kept in the dark and fed a bunch of B-S,  hahahaha!

Friday, June 11, 2010

A couple of thank you cards

I got a very nice gift from my Aunt and Uncle for my birthday and I thought I would take a minute to make them a thank you card.  I made one and then decided to make another one for use in the future…I mean you can always use a thank you card, right?!  Both Frog and butterfly are from Create a Critter.  Embossing folder on butterfly card is Cuttlebug Stylized Flowers.