Showing posts with label cat's eye chalks. Show all posts

Sunday, October 16, 2011

Halloween Mini Album

I have never posted this because I was never impressed with it. I have this clear storage tote that I keep either test projects or projects I have made but don’t really know what to do with. This was my first attempt at a mini album and it is actually from a couple of years ago. Some of you may remember Bugjunkie; well, she inspired the idea and had a tutorial on her blog on how to create these mini albums in Design Studio. At the time I didn’t have a binding machine (I now have two that I have STILL never used – probably need to work on that huh?) so I had it bound at a local printing shop so I didn’t really have much of a say in the binding. Anyway, a month or so ago a good friend of mine was over trying to convince me to participate in a holiday sale. I pulled the box down to see what I had that I could sell and when I pulled the book out she went nuts for it and wanted to buy it. I hadn’t even taken pictures, so I told her that I needed to take pictures and she could have it. She asked me to teach her how to make one, so I told her to save some cereal boxes and then we could spend a day making mini albums. Every time I have seen her since she tells me she won’t let her husby throw away any cereal boxes LOL! I can’t wait to do this with her…I love spending time with her!!

If you are interested in the details of how I made it or would like the cut file let me know and I will email it to you. 


Sunday, October 3, 2010

Happy 10th Dawson!!

My youngest nephew, Dawson, will be 10 this month.  I wanted to make him a card that would fit a boy his age but still be manly and “cool”.  He enjoys drawing so he actually appreciates the stuff I have made him in the past.  I think he will really like this.  Of course this is not an original idea, you can google these wallets all day, but making them your own is the trick.  Here is my supply list:

SU! Cardstock – Chocolate Chip
Cuttlebug Folder –  Mesh Texture
Cat’s Eye Chalk Ink – Dark Brown
Versamark – Frost
PK Glitz Embossing Powder – Crystal

Click HERE to see a video on how to make the basic wallet card

Wednesday, June 16, 2010

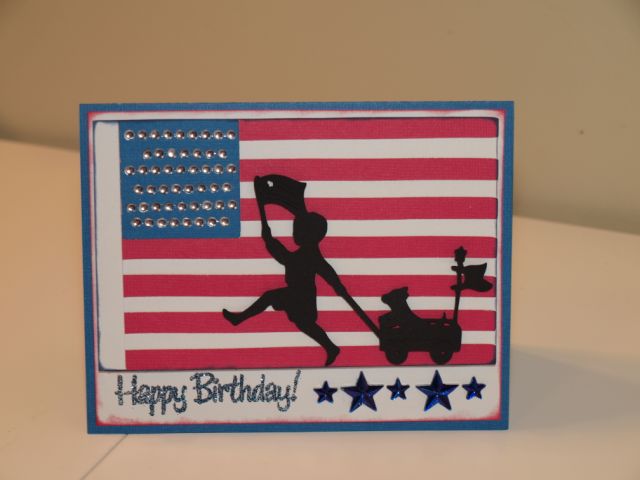
Patriotic Birthday Card

Well, like I have said before, I think it is important when making a card to make it special for the recipient by using a color, symbol or putting a meaningful memory or saying into it.  I mean what is the point of hand making cards for people if you don’t want it to mean anything to them?  You could just go buy one if you didn’t want it to be personalized!

One of my uncles is a very patriotic guy and really appreciates the US flag.   Being that I hadn’t used my Stand and Salute cart EVER I thought I would try to get some use out of it by making a birthday card for my Uncle.  It is not easy to make a card like this attractive, but I did the best I could.  I hope you like it, but better yet, I hope he likes it J.
I used Stand and Salute for the flag, A Child’s Year for the image of the kid holding a flag with his wagon in tow.  Happy Birthday sentiment was stamped using a glue pad and then PK Glitz glitter (which I absolutely love – it just sparkles so much better than regular glitter).  Thanks for looking!

Saturday, June 5, 2010

Holy Mackerel...he's 19!

My oldest nephew just turned 19.  I had a card made for him that I just wasn’t loving.  It really is a challenge making cards for guys!  Then I saw it…the perfect card for him.  It was the customer spotlight card in the May 18th issue of the Cricut Chirp Newsletter.  I HAD to scrap lift it, and as the rule goes…give credit where credit is due. You see my nephew eats, sleeps and breathes fishing; making this card a perfect fit.  Of course I changed it up a little and didn’t use some of the cartridges that Ms. Nooren Pierce used.  I decided to use a real fishing lure dangling from the rod, instead of the age she used.  I tried to get a more realistic look by using a silver shimmering ink pad I had (I hope you can see it in the pics).  I thought it turned out super cute and he loved it, which is all that mattered.

Saturday, February 13, 2010

Valentine Gifts for Co-workers

I made these chocolates and then bagged and tagged them for Valentine's Day to give to the girls I work with.  They loved them.  Oh, I also included a picture of the cards I gave them... 


The wording on the card was heat embossed using Versamark Dazzle (Frost) and Stamp 'n Stuff embossing powder (Kaleidescope) and says "all things grow with love". The card itself is embossed using the Cuttlebug Heart Blocks embossing folder and inked using fluid chalk.

Sunday, January 3, 2010

Birthday Card for BIL

This is my first card using Sweet Treats. I used the card function for image #11 on the overlay (or page 34 of the handbook). The 'recipe' is below.


Cuts: (all images cut at 7 1/2")

  • cards feature - cut with beige cardstock
  • shift - cut with pink cardstock
  • layers - cut with Coredinations Chocolate Box/mint green
  • layers shift - cut with red cardstock

Cuttlebugged:

  • cone/beige cardstock using Tiny Mosaic Texture folder
  • top scoop of ice cream/Coredinations cardstock using Divine Swirls folder (make sure the stem isn't in the folder when running through the cuttlebug
  • strawberry/red cardstock using Swiss Dots folder

I then inked the cone and strawberry to bring out the texture and all edges of each piece using Colorbox Cat's Eye Fluid Chalks. I then put a light coat of Glossy Accents on the strawberry to make it shine. Then I sanded the Coredinations cardstock to let the mint color show through. After that I adhered all the layers to the card and stamped with 'happy birthday' using Versamark and bronze embossing powder and applied heat. That's it!

By the way...I am very new to heat embossing. I learned on this card that it doesn't work so well with the small stamps ;)! Just a tip in case you haven't tried it before either. This is only my second try with heat embossing. Gotta start somewhere, right?